پیاده سازی کامپوننت های خود در یک کامپوننت pre built-in با استفاده از گسترش زیر کلاس با کلاس تعریف شده اختصاصی
اندروید تعداد زیادی ابزار های پیش ساخته مانند دکمه ها ، کادرهای نمایش متن، کادرهای ویرایش متن، لیست ها ، چک باکس ها ، دکمه های رادیویی، گالری ها ، اسپینر ها ، جعبه های نمایش متن با قابلیت حدس زدن واژه کاربر و غیره را ارائه میدهد. شما میتوانید این ابزار ها را مستقیم در نرم افزار خود بکار ببرید. اما ممکن است شرایطی وجود داشته باشد که شما ابزاری بخواهید که در ابزار های پیشفرض وجود نداشته باشد. اندروید به شما امکان ایجاد کامپوننت مد نظرتان را میدهد که نیازهایتان را با آن برآورده کنید.
اگر شما تنظیمات کمی میخواهید به یک ابزار موجود و یا طرحبندی موجود اضافه کنید. شما میتوانید بسادگی با یک زیر کلاس برای ابزار یا طرحبندی مدنظر خود متدهای آنها بازنویسی کنید، کاری که به شما کنترل دقیقی از نحوه نمایش و عملکرد ابزار خواهد داد.
این آموزش نحوه ایجاد یک View سفارشی و استفاده از آن در نرم افزار خود با چند گام ساده را آموزش خواهد داد.

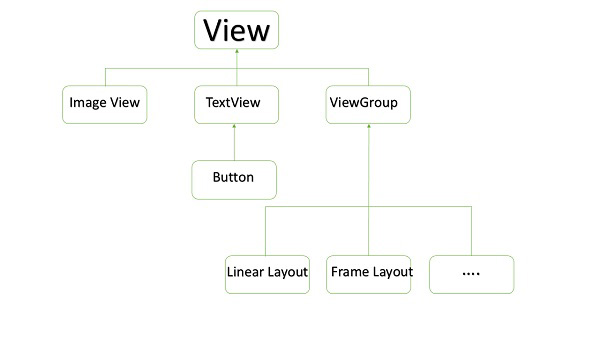
نمونه ای از کامپوننت های سفارشی در ساختار درختی View
ایجاد یک کامپوننت سفارشی
|
گام
|
توضیحات
|
|
1
|
در نرم افزار اندروید استودیو یک نرم افزار به نام myapplication زیر شاخه com.example.sargonco.myapplication ایجاد کنید. انجام اینکار در آموزش پروژه سلام دنیا توضیح داده شد.
|
|
2
|
یک فایل XML در شاخه ی res/values/attrs.xml برای تعریف یک صفت به همراه نوع داده ی آن ایجاد کنید.
|
|
3
|
فایل src/mainactivity.java را ایجاد کرده و کد های لازم برای تعریف کامپوننت های سفارشی را ایجاد کنید.
|
|
4
|
فایل res/layout/activity_main.xml را ویرایش کنید. تا کامپوننت نمای رنگی را با تعییر صفات و ایجاد صفات جدید به آن بیافزاید.
|
|
5
|
نرم افزار خود را اجرا کنید تا به شبیه ساز متصل شوید و از صحت تغییرات مطمئن شوید.
|
در زیر کدهای فایل attrs.xml در زیرشاخه attrs.xml را مشاهده میکنید.
<?xml version="1.0" encoding="utf-8"?>
<resources>
<declare-styleable name="TimeView">
<declare-styleable name="TimeView">
<attr name="title" format="string" />
<attr name="setColor" format="boolean"/>
</declare-styleable>
</declare-styleable>
</resources>
فایل layout file که توسط اکتیویتی مورد استفاده قرار میگیرد را بصورت زیر ویرایش کنید.
<?xml version="1.0" encoding="utf-8"?>
<RelativeLayout xmlns:android="http://schemas.android.com/apk/res/android"
xmlns:tools="http://schemas.android.com/tools"
xmlns:custom="http://schemas.android.com/apk/res-auto"
android:layout_width="match_parent"
android:layout_height="match_parent"
tools:context=".MainActivity" >
<com.example.tutorialspoint7.myapplication.TimeView
android:id="@+id/timeView"
android:layout_width="match_parent"
android:layout_height="wrap_content"
android:textColor="#fff"
android:textSize="40sp"
custom:title="my time view"
custom:setColor="true" />
<TextView
android:layout_width="match_parent"
android:layout_height="wrap_content"
android:id="@+id/simple"
android:layout_below="@id/timeView"
android:layout_marginTop="10dp" />
</RelativeLayout>
فایل جاوا اسکریپت زیر را با نام timeview در compound view ایجاد کنید.
package com.example.tutorialspoint7.myapplication;
/**
* Created by TutorialsPoint7 on 9/14/2016.
*/
import java.text.SimpleDateFormat;
import java.util.Calendar;
import android.content.Context;
import android.content.res.TypedArray;
import android.graphics.Color;
import android.util.AttributeSet;
import android.widget.TextView;
public class TimeView extends TextView {
private String titleText;
private boolean color;
public TimeView(Context context) {
super(context);
setTimeView();
}
public TimeView(Context context, AttributeSet attrs) {
super(context, attrs);
// retrieved values correspond to the positions of the attributes
TypedArray typedArray = context.obtainStyledAttributes(attrs,
R.styleable.TimeView);
int count = typedArray.getIndexCount();
try{
for (int i = 0; i < count; ++i) {
int attr = typedArray.getIndex(i);
// the attr corresponds to the title attribute
if(attr == R.styleable.TimeView_title) {
// set the text from the layout
titleText = typedArray.getString(attr);
setTimeView();
} else if(attr == R.styleable.TimeView_setColor) {
// set the color of the attr "setColor"
color = typedArray.getBoolean(attr, false);
decorateText();
}
}
}
// the recycle() will be executed obligatorily
finally {
// for reuse
typedArray.recycle();
}
}
public TimeView(Context context, AttributeSet attrs, int defStyle) {
super(context, attrs, defStyle);
setTimeView();
}
private void setTimeView() {
// has the format hour.minuits am/pm
SimpleDateFormat dateFormat = new SimpleDateFormat("hh.mm aa");
String time = dateFormat.format(Calendar.getInstance().getTime());
if(this.titleText != null )
setText(this.titleText+" "+time);
else
setText(time);
}
private void decorateText() {
// when we set setColor attribute to true in the XML layout
if(this.color == true){
// set the characteristics and the color of the shadow
setShadowLayer(4, 2, 2, Color.rgb(250, 00, 250));
setBackgroundColor(Color.CYAN);
} else {
setBackgroundColor(Color.RED);
}
}
}
فایل Main activity java را به کدهای زیر تغییر دهید و نرم افزار را اجرا کنید.
package com.example.tutorialspoint7.myapplication;
import android.os.Bundle;
import android.widget.TextView;
import android.app.Activity;
public class MainActivity extends Activity {
@Override
protected void onCreate(Bundle savedInstanceState) {
super.onCreate(savedInstanceState);
setContentView(R.layout.activity_main);
TextView simpleText = (TextView) findViewById(R.id.simple);
simpleText.setText("That is a simple TextView");
}
}
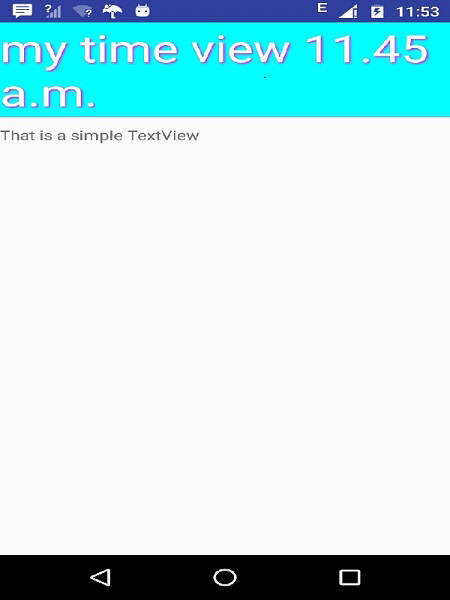
اگر همه چیز بدرستی پیش رود شما پنجره زیر را در شبیه ساز خواهید دید:

براي بهره مندي از مشاوره تخصصي در زمینه برنامه نویسی اندروید در کرج با شرکت سارگون تماس بگيريد.