در این مقاله ما به نحوه ایجاد پیام های یا Notification ها در اندروید خواهیم پرداخت.

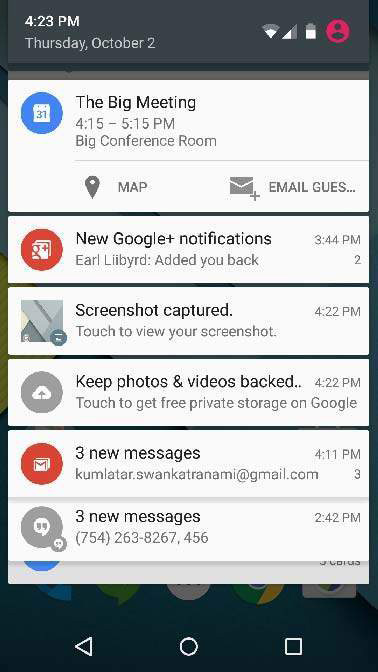
یک اطلاعیه یک پیام است که شما میتوانید در خارج از نرم افزار خود در یک رابط کاربری نرمال به کاربر نشان دهید. پس از اینکه به سیستم اعلام کردید که یک پیام صادر کند، پیام اول بعنوان یک آیکون در ناحیه اطلاعیه ها به نمایش گذارده می شود. برای دیدن جزئیات پیام ، کاربر کشوی پیام ها را پایین می آورد. ناحیه پیام و کشوی پیام ها هر دو از کنترلرهای سیستمی هستند که کاربر می تواند در هر زمانی آنها را دیده و به آنها دسترسی داشته باشد.
کلاس Toast اندروید یک روش دستی برای نمایش هشدار به کاربران دارد ولی مشکل این است که این پیام ها در صفحه باقی نمی مانند و این بدان معنا است که پیام در صفحه چند بار به سرعت ظاهر شده و اصلاحاً فلاش زده و سپس محو میشود.

برای مشاهده جزئیات پیام ، شماباید ایکون آنر انتخاب کنید ، تا پیام را در کشوی پیام ها یعنی جایی که جزئیات پیام مشخص است به شما نشان دهد. اگر میخواهید در شبیه ساز ناحیه کشوی پیام ها را مشاهده کنید باید با موس آنرا به سمت پایین دراگ کنید. در تصویر زیر پیام های با ارتفاع نرمال 64dp را مشاهده میکنید.

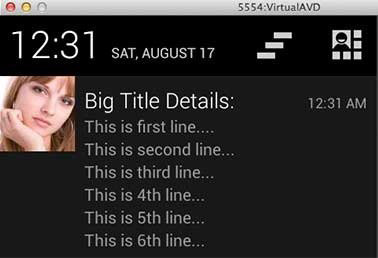
فرم بالا میتواند یک نمای بزرگ داشته باشد که جزئیات بیشتری راجع به پیام به نمایش بگذارد. شما میتوانید بیش از شش خط به پیام خود برای نمایش در قسمت پیام ها اضافه کنید.
ایجاد و ارسال پیام یا اطلاعیه
روش ساده ای برای ایجاد پیام وجوددارد. گامهای زیر را با ما طی کنید، تا بسادگی یک پیام ایجاد کنید.
گام 1- یک سازنده پیام ایجاد کنید- Create Notification Builder :
بعنوان گام اول برای ساخت یک سازنده پیام از NotificationCompat.Builder.build() استفاده کنید. شما از سازنده پیام برای تنظیم ویژگی های مختلف پیام مانند بزرگی و کوچکی آیکون ها ، عنوان ها و اولویت ها استفاده می کنید.
NotificationCompat.Builder mBuilder = new NotificationCompat.Builder(this)
گام 2-تنظیمات ویژگی های پیام
پس از آنگه سازنده خود را بوجود آوردید میتوانید ویژگی های پیام را تنظیم کنید. تنظیمات پیام ها اختیاری است ولی تنظیمات زیر بصورت اجباری باید در هر سازنده پیام انجام شود.
A small icon, set by setSmallIcon()
A title, set by setContentTitle()
Detail text, set by setContentText()
mBuilder.setSmallIcon(R.drawable.notification_icon);
mBuilder.setContentTitle("Notification Alert, Click Me!");
mBuilder.setContentText("Hi, This is Android Notification Detail!");
شما امکانات زیادی برای تعریف ویژگی های یک پیام دارید.
گام 3- پیوستن عملیات Attach Actions :
این بخش اختیاری است و در صورتی که بخواهید یک عملیات را به پیام ها مرتبط کنید بکار خواهد آمد. یک عملیات به کاربران اجازه میدهد که مستقیما از پیام به اکتیویتی درون نرم افزار بروند، به این ترتیب کاربران امکان انجام چندین کار را در نرم افزار خواهند داشت.
عملیات توسط یک PendingIntent که دارای یک intent است که یک اکتیویتی را در نرم افزار شما شروع می کند. برای هماهنگی PendingIntent با یک gesture (حرکاتی که با دست روی گوشی انجام میشود تا عملیات خواصی رخ دهد) ، یک متد مرتبط از NotificationCompat.Builder فراخوانی میشود. برای مثال : اگر شما بخواهید هنگامیکه روی متن یک پیام در کشوی متن کلیک می کنید یک اکتیویتی اجرا شود شما میتواند یک PendingIntent را با فراخوانی setContentIntent() اضافه کنید.
یک شیئ PendingIntent به شما کمک میکند تا یک اکشن را در نرم افزار خود تعریف کنید. و اینکار بدون اینکه نرم افزار شما در حال حاضر در حال اجرا باشد رخ میدهد.
برای انجام اینکار از یک شیئ stack builder که دارای یک back stack مصنوعی برای راه اندازی اکتیویتی است کمک گرفته ایم. اینکار باعث میشود که بتوانیم به صفحه اصلی نرم افزار خود بازگردیم.
Intent resultIntent = new Intent(this, ResultActivity.class);
TaskStackBuilder stackBuilder = TaskStackBuilder.create(this);
stackBuilder.addParentStack(ResultActivity.class);
// Adds the Intent that starts the Activity to the top of the stack
stackBuilder.addNextIntent(resultIntent);
PendingIntent resultPendingIntent = stackBuilder.getPendingIntent(0,PendingIntent.FLAG_UPDATE_CURRENT);
mBuilder.setContentIntent(resultPendingIntent);
مدیریت پیام
در آخر شما شیئ پیام را به سیستم بازگردانی می کنید. اینکار با فراخوانی NotificationManager.notify() برای ارسال پیام شما انجام میشود. مطمئن شوید که شما متد NotificationCompat.Builder.build() را در شیئ ایجاد کننده پیام builder object قبل از فراخوانی پیام ایجاد کنید . این متد تمام گزینه های که به آن ارسال و از آن ارجاع داده میشود را ترکیب می کند:
NotificationManager mNotificationManager = (NotificationManager) getSystemService(Context.NOTIFICATION_SERVICE);
// notificationID allows you to update the notification later on.
mNotificationManager.notify(notificationID, mBuilder.build());
کلاس NotificationCompat.Builder
کلاس NotificationCompat.Builder امکان کنترل آسانتر را به شما میدهد، این کلاس به ایجاد ساختار ظاهری نرم افزار شما هم کمک می کند. در زیر لیستی از متدهای پرکاربرد در کلاس NotificationCompat.Builder آشنا میشویم:
|
Sr.No
|
Constants & Description
|
|
1
|
Notification build():
تمام گزینه های ارسال و دریافت یک شئی پیام را ترکیب می کند
|
|
2
|
NotificationCompat.Builder
برای تنظیم AutoCancel (boolean autoCancel)
این کار بطور اتوماتیک یک پیام را در صورت کلیک کنسل کرده و از لیست کشوی پیام ها حذف می کند.
|
|
3
|
NotificationCompat.Builder
تنظیم محتوا (RemoteViews views)
ارائه یک RemoteViews سفارشی برای استفاده بجای گزینه استاندارد
|
|
4
|
NotificationCompat.Builder setContentInfo (CharSequence info)
تنظیم متن بزرگ در سمت راست پیام
|
|
5
|
NotificationCompat.Builder setContentIntent (PendingIntent intent)
ارائه یک PendingIntent برای ارسال در زمانیکه روی پیام کلیک می شود.
|
|
6
|
NotificationCompat.Builder setContentText (CharSequence text)
تنظیم اندازه متن خط دوم پیام در کشوی پیام ، در حالت استاندارد.
|
|
7
|
NotificationCompat.Builder setContentTitle (CharSequence title):
تنظیم متن خط اول پیام ، در حالت استاندارد
|
|
8
|
NotificationCompat.Builder setDefaults (int defaults)
تنظیم گزینه ها بر روی حالت پیشفرض برای پیام ها
|
|
9
|
NotificationCompat.Builder setLargeIcon (Bitmap icon)
تنظیم ایکون بزرگ برای نمایش در تیکر و کشوی پیام
|
|
10
|
NotificationCompat.Builder setNumber (int number)
تنظیم اعداد بزرگ در سمت راست پیام
|
|
11
|
NotificationCompat.Builder setOngoing (boolean ongoing)
تنظیم یک پیام ongoing
|
|
12
|
NotificationCompat.Builder setSmallIcon (int icon)
تنظیم ایکون کوچک برای استفاده در ظاهر پیام
|
|
13
|
NotificationCompat.Builder setStyle (NotificationCompat.Style style)
افزودن یک استایل برای اعمال در زمان ساخت یک پیام
|
|
14
|
NotificationCompat.Builder setTicker (CharSequence tickerText)
تنظیم متن که در نوار وضعیت برای اولین بار به نمایش در میآید.
|
|
15
|
NotificationCompat.Builder setVibrate (long[] pattern)
ایجاد الگوی ویبره برای استفاده
|
|
16
|
NotificationCompat.Builder setWhen (long when)
تنظیم زمان رخداد ، پیام شما در پنل براساس این زمان چیدمان خواهد شد.
|
مثال:
مثال زیر عمکرد پیام را در کلاس NotificationCompat.Builder که از اندروید 4.1 به بعد قابل استفاده است را نشان میدهد.
|
گام
|
توضیحات
|
|
1
|
نرم افزار اندروید استودیو را اجرا و یک نرم افزار به نام sargonco در زیر شاخه com.example.notificationdemo ایجاد کنید.
|
|
2
|
فایل src/MainActivity.java را ویرایش کنید و کدی را برای ارسال پیام ("") در صورت کلیک کاربر روی دکمه ایجاد کنید. این کار سرویس پیام اندروید را فراخوانی می کند
|
|
3
|
یک فایل جدید جاوا به نام src/NotificationView.java که برای نمایش ظاهر جدید به عنوان یک بخش جدید از اکتیویتی که هنگامی که کاربر روی هرکدام از پیام ها کلیک کرد اجرا شود.
|
|
4
|
تغییر فایل XML در پوشه res/layout/activity_main.xml و افزودن دکمه پیام در قسمت مربوطه
|
|
5
|
ایجاد یک فایل XML جدید در پوشه res/layout/notification.xml این فایل به عنوان فایل layout یا طرحبندی برای یک اکتیویتی جدید که هنگامیکه کاربر روی یک پیام کلیک می کند ایجاد می شود.
|
|
6
|
نیازی به تغییر فایل پیشفرض متنی نیست ، اندروید استودیو خودش این فایل را تغییر میدهد.
|
|
7
|
نرم افزار را اجرا کنید، اگر شبیه ساز درست عمل کند نرم افزار شما اجرا خواهد شد.
|
در کد زیر فایل تغییر یافته src/com.example.notificationdemo/MainActivity.java. را میبینید این کدها حاوی چرخه حیات متد است.
package com.example.notificationdemo;
import android.app.Activity;
import android.app.NotificationManager;
import android.app.PendingIntent;
import android.content.Context;
import android.content.Intent;
import android.support.v4.app.NotificationCompat;
import android.os.Bundle;
import android.view.View;
import android.widget.Button;
public class MainActivity extends Activity {
Button b1;
@Override
protected void onCreate(Bundle savedInstanceState) {
super.onCreate(savedInstanceState);
setContentView(R.layout.activity_main);
b1 = (Button)findViewById(R.id.button);
b1.setOnClickListener(new View.OnClickListener() {
@Override
public void onClick(View v) {
addNotification();
}
});
}
private void addNotification() {
NotificationCompat.Builder builder =
new NotificationCompat.Builder(this)
.setSmallIcon(R.drawable.abc)
.setContentTitle("Notifications Example")
.setContentText("This is a test notification");
Intent notificationIntent = new Intent(this, MainActivity.class);
PendingIntent contentIntent = PendingIntent.getActivity(this, 0, notificationIntent,
PendingIntent.FLAG_UPDATE_CURRENT);
builder.setContentIntent(contentIntent);
// Add as notification
NotificationManager manager = (NotificationManager) getSystemService(Context.NOTIFICATION_SERVICE);
manager.notify(0, builder.build());
}
}
کدهای زیر محتوای فایل res/layout/notification.xml میباشد.
<?xml version="1.0" encoding="utf-8"?>
<LinearLayout xmlns:android="http://schemas.android.com/apk/res/android"
android:orientation="vertical"
android:layout_width="fill_parent"
android:layout_height="fill_parent" >
<TextView
android:layout_width="fill_parent"
android:layout_height="400dp"
android:text="Hi, Your Detailed notification view goes here...." />
</LinearLayout>
کدهای زیر محتوای تغییر یافته فایل src/com.example.notificationdemo/NotificationView.java. میباشد.
package com.example.notificationdemo;
import android.os.Bundle;
import android.app.Activity;
public class NotificationView extends Activity{
@Override
public void onCreate(Bundle savedInstanceState){
super.onCreate(savedInstanceState);
setContentView(R.layout.notification);
}
}
کدهای زیر محتوای فایل res/layout/activity_main.xml میباشد.
<RelativeLayout xmlns:android="http://schemas.android.com/apk/res/android"
xmlns:tools="http://schemas.android.com/tools"
android:layout_width="match_parent"
android:layout_height="match_parent"
android:paddingBottom="@dimen/activity_vertical_margin"
android:paddingLeft="@dimen/activity_horizontal_margin"
android:paddingRight="@dimen/activity_horizontal_margin"
android:paddingTop="@dimen/activity_vertical_margin"
tools:context="MainActivity">
<TextView
android:id="@+id/textView1"
android:layout_width="wrap_content"
android:layout_height="wrap_content"
android:text="Notification Example"
android:layout_alignParentTop="true"
android:layout_centerHorizontal="true"
android:textSize="30dp" />
<TextView
android:id="@+id/textView2"
android:layout_width="wrap_content"
android:layout_height="wrap_content"
android:text="Tutorials point "
android:textColor="#ff87ff09"
android:textSize="30dp"
android:layout_below="@+id/textView1"
android:layout_centerHorizontal="true"
android:layout_marginTop="48dp" />
<ImageButton
android:layout_width="wrap_content"
android:layout_height="wrap_content"
android:id="@+id/imageButton"
android:src="@drawable/abc"
android:layout_below="@+id/textView2"
android:layout_centerHorizontal="true"
android:layout_marginTop="42dp" />
<Button
android:layout_width="wrap_content"
android:layout_height="wrap_content"
android:text="Notification"
android:id="@+id/button"
android:layout_marginTop="62dp"
android:layout_below="@+id/imageButton"
android:layout_centerHorizontal="true" />
</RelativeLayout>
در ادامه کدهای فایل res/values/strings.xml را مشاهده می کنید.
<?xml version="1.0" encoding="utf-8"?>
<resources>
<string name="action_settings">Settings</string>
<string name="app_name">tutorialspoint </string>
</resources>
کد های زیر محتوای فایل AndroidManifest.xml میباشند.
<?xml version="1.0" encoding="utf-8"?>
<manifest xmlns:android="http://schemas.android.com/apk/res/android"
package="com.example.notificationdemo" >
<application
android:allowBackup="true"
android:icon="@drawable/ic_launcher"
android:label="@string/app_name"
android:theme="@style/AppTheme" >
<activity
android:name="com.example.notificationdemo.MainActivity"
android:label="@string/app_name" >
<intent-filter>
<action android:name="android.intent.action.MAIN" />
<category android:name="android.intent.category.LAUNCHER" />
</intent-filter>
</activity>
<activity android:name=".NotificationView"
android:label="Details of notification"
android:parentActivityName=".MainActivity">
<meta-data
android:name="android.support.PARENT_ACTIVITY"
android:value=".MainActivity"/>
</activity>
</application>
</manifest>
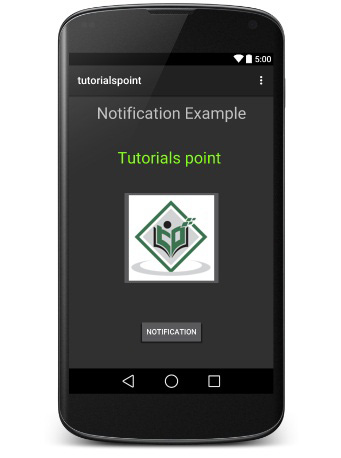
برای اجرای نرم افزار باید AVD را نصب کنید. سپس یک اکتیویتی را بازکرده و در نوار ابزار روی Run کلیک کنید. اگر نصب نرم افزار درست پیشرفت عکس زیر را مشاهده می کنید.

حالا روی دکمه کلیک کنید، شما خواهید دید یک پیام در بالا با عنوان "New Message Alert!" ظاهر میشود. این پیام بعد از چند دقیقه محو شده و در بالای سمت چپ یک ایکون ظاهر میشود.
حالا روی ایکون یک کلیک طولانی کنید.بعد از یک ثانیه تاریخ ارسال پیام که در این مثال بصورت ساعت خواهد بود را نمایش میدهد . حالا اگر نوار وضعیت را به پایین بکشید با پنجره زیر مواجه میشوید:

پیام بزرگ (با حالت بنر یا عکس دار)
کد های زیر نشان میدهند که چگونه پیام هشداری مثال قبل را برای ایجاد یک پیام با استایل Inbox big view میتوانیم بکار ببریم. ما displayNotification() را بروز رسانی کرده ایم تا این عملیات را انجام دهد:
protected void displayNotification() {
Log.i("Start", "notification");
/* Invoking the default notification service */
NotificationCompat.Builder mBuilder = new NotificationCompat.Builder(this);
mBuilder.setContentTitle("New Message");
mBuilder.setContentText("You've received new message.");
mBuilder.setTicker("New Message Alert!");
mBuilder.setSmallIcon(R.drawable.woman);
/* Increase notification number every time a new notification arrives */
mBuilder.setNumber(++numMessages);
/* Add Big View Specific Configuration */
NotificationCompat.InboxStyle inboxStyle = new NotificationCompat.InboxStyle();
String[] events = new String[6];
events[0] = new String("This is first line....");
events[1] = new String("This is second line...");
events[2] = new String("This is third line...");
events[3] = new String("This is 4th line...");
events[4] = new String("This is 5th line...");
events[5] = new String("This is 6th line...");
// Sets a title for the Inbox style big view
inboxStyle.setBigContentTitle("Big Title Details:");
// Moves events into the big view
for (int i=0; i < events.length; i++) {
inboxStyle.addLine(events[i]);
}
mBuilder.setStyle(inboxStyle);
/* Creates an explicit intent for an Activity in your app */
Intent resultIntent = new Intent(this, NotificationView.class);
TaskStackBuilder stackBuilder = TaskStackBuilder.create(this);
stackBuilder.addParentStack(NotificationView.class);
/* Adds the Intent that starts the Activity to the top of the stack */
stackBuilder.addNextIntent(resultIntent);
PendingIntent resultPendingIntent =stackBuilder.getPendingIntent(0,PendingIntent.FLAG_UPDATE_CURRENT);
mBuilder.setContentIntent(resultPendingIntent);
mNotificationManager = (NotificationManager) getSystemService(Context.NOTIFICATION_SERVICE);
/* notificationID allows you to update the notification later on. */
mNotificationManager.notify(notificationID, mBuilder.build());
}
حالا اگر که نرم افزار را اجرا کنید خواهید دید که پیام در حالتی گسترده تر و بنر مانند به نمایش در آمده است.

براي بهره مندي از مشاوره تخصصي در زمینه برنامه نویسی اندروید در کرج با شرکت سارگون تماس بگيريد